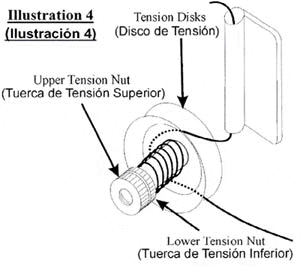
Thread Tension — Tension is the degree of resistance the thread meets in passing between the tension disks. Too loose a tension will cause the thread to break or will leave loose loops of thread on the bag instead of nice firm stitches. Too tight a tension will also cause the thread to tear or will cause polypropylene bag material to pucker. In either case, the machine may not chain off. To alter the amount of tension, loosen upper tension nut (see illustration 4). Turn the lower tension nut about 1/8 turn at a time to loosen the tension, or down to tighten the tension. Test the material until desired stitch appearance is obtained. Be sure to re-lock upper tension nut.

THREADING THE ECR
- Disconnect the ECR from the electrical supply.
- To install a new cone of thread, push the thread clamping bolt through the hole at the top of the cone and securely lock it in position with the wing nut (see illustration 2). The cone must not be able to rotate or wobble on the thread stand.

- Follow illustration 3 below to properly lead the thread through the machine.

- Check that the thread passes around the tension disk properly. Do NOT wind the thread around the disk more than what is shown.
- Let the thread stick out 2″ on the output side of the machine (through the needle).
- In order to produce a thread chain, a piece of bag material should be placed between the presser foot and the throat plate before running the machine. Loosen the sewing head drive belt tension. Turn the pulley by hand in a clockwise direction so the sewn bag proceeds forward through at least three complete cycles. This will start the chaining process. Run the system to clear out the test bag material before attempting to run a bag through the system. If this procedure is not followed, the chain will not start and the machine may break the needle.
